If you’ve ever grown tired of the “Storage Almost Full” warning, you’re not alone. My main drive fills up faster than I can clear it, but I’m finally tackling the problem for good without losing anything important.
4Compress and Archive Files on External Hard Drives
One of the most effective ways to manage storage is by compressing and archiving files that I don’t frequently access. Instead of deleting old projects, photos, or videos, I compress them and move them to external hard drives.
For compression, I primarily use7-Zipbecause of its high compression ratio, especially when using the 7z format. This creates smaller archive files, which saves disk space and makes file transfers faster. What’s great about 7-Zip is that it’s open-source and free to use, with a large community of developers constantly improving it. I also useZArchivertocreate ZIP files on my Android smartphonebefore I transfer them to an external hard drive.

When compressing files on external drives, I’ve learned to avoid compressing the entire drive itself. While Windows offers a “compress this drive to save disk space” option in drive properties, I don’t recommend using it on your main system drive as it can lead to system instability and poor performance. Instead, I selectively compress individual folders and files.
For files I rarely access but want to keep (like old project archives or family photos), here’s what I do:

I’ve learned through experience that not all file types compress equally. Files already compressed (like JPGs, MP3s, and most video formats) won’t compress much further. Text documents, raw image files, and uncompressed data compress exceptionally well.
I’ve also learned that it’s more practical to create several smaller archives rather than one massive file when dealing with large collections of files. By organizing my archives based on content type such as images, videos, or documents—I can quickly find what I need without having to extract or transfer a huge archive every time. This approach makes managing my backups easier and saves time when I need to access specific files later on.
3Transfer All Large Files to My NAS
After compressing my files, I either keep them on external hard drives or transfer them to my NAS (Network Attached Storage) that I’d built using an old gaming laptop I had lying around.Creating a personal NAS was surprisingly straightforward and is one of the mostpractical ways to reuse your barely functioning laptop.It runs on a 2nd-Gen Intel Core i5 CPU and 8GB RAM. The only hardware change was upgrading the storage drive. For the operating system, I installed TrueNAS, which offers flexible options for storage management and provides an easy-to-use interface. Of course, you can also get a prebuilt NAS and save on setup time.
Moving files to my NAS is simple thanks to network file sharing. On my Windows PC, I use the built-in SMB (Server Message Block) protocol to access my TrueNAS network shares directly through File Explorer. This integration makes it feel like working with any other folder on my computer, allowing me to drag and drop large files or entire folders without hassle. For transfers from my smartphone, I useCX File Explorer, which connects to the NAS using the same SMB protocol. This app provides an intuitive interface for browsing and moving files between my phone and the NAS, making it easy to offload photos, videos, or documents wirelessly.

What I love most about my NAS setup is the flexibility it provides. It serves as extended storage, and I’ve also configured it torun Plex Media Server, giving me a private streaming platform. The system uses significantly less power than keeping a full desktop running 24/7, which is an added bonus.
2Use Duplicate File Finder Tools to Remove Redundancies
Before archiving or transferring files, I make it a point to eliminate duplicates. Duplicate files not only take up large amounts of storage space but also reduce system performance by creating unnecessary data for your computer to process.
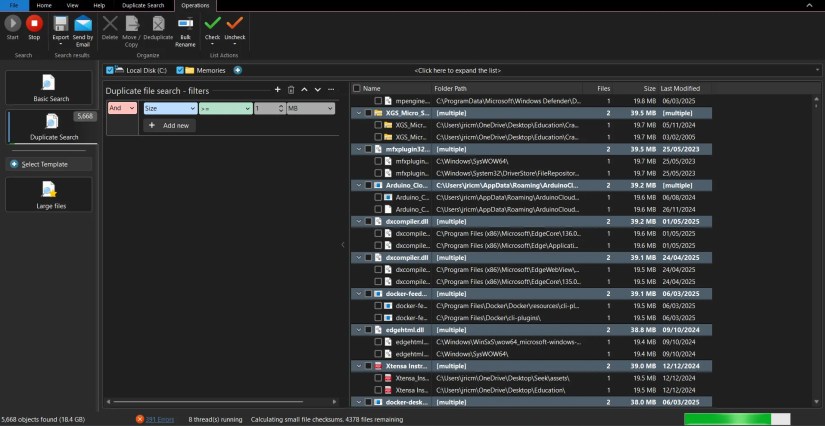
After trying several options, I settled onTreeSizeas my tool of choice. TreeSize includes a duplicate file finder that is both straightforward and effective. The duplicate search can be started from the main interface, letting you scan specific drives or folders for redundant files. You can also choose different comparison filters, such as name, size, date, or file content using checksums for even greater accuracy. While checksum-based comparison is slower, it ensures that only true duplicates are flagged, minimizing the risk of false positives.
What I like about TreeSize is its helpful filters, allowing me to search for files above a certain size or of specific types, making the process faster and more targeted. Once duplicates have been found, I can then review the results, preview files, and safely delete or archive them.
Here are the basic rules I follow when scanning for duplicates:
By using a duplicate finder, I was able to save massive amounts of storage space by removing duplicate photos, downloads, and backup copies I’d forgotten about.
1Use Storage Sense to Wipe Specific Folders When Storage Is Low
Storage Sense is one of thoseWindows features that should always be on by default. This automated tool helps prevent storage emergencies by cleaning up unnecessary files before my drive hits critical capacity.
Storage Sense works on your system drive (typically C:) and can be configured to run automatically when your device is low on disk space. To enable it, I go toSettings>System>Storageand toggleStorage SensetoOn.
What makes Storage Sense particularly useful is its ability to target specific types of files. I’ve configured mine to focus on:
I particularly like that Storage Sense is non-invasive. It won’t touch your essential files or applications since it only removes temporary files and items that are safe to delete. For those worried about accidentally losing important downloads, you can exclude specific folders from automatic cleanup or adjust the timing settings to your preference.
On my system, I’ve noticed that regular Storage Sense cleanups prevent the sudden performance drops that used to occur when my drive approached capacity. This proactive approach means I rarely see those “low disk space” warnings anymore, and my computer maintains consistent performance.
By implementing these four strategies, I’ve transformed my storage situation from constantly worrying about space to having a streamlined, reliable system that keeps my important files safe and accessible. With the right tools and habits, managing storage is no longer a chore—it’s just part of my routine, and my drives have never been full since.
