In today’s visually-driven world, explainer videos have become an essential tool for successful communication. The goal of content creators in the digital landscape is to produce engaging material that delivers messages effectively. This can be done by creating compelling explainer videos for YouTube using tools like Reallusion’sCartoon Animator (CTA).
1. The Anatomy of an Explainer Video
Crafting a compellingexplainer videorequires careful consideration of multiple elements, each playing a crucial role in its effectiveness. By following these steps, you’ll be able to create an engaging and impactful explainer video.
2. YouTube Analytics: Decoding Audience Preferences
Audience engagement plays a pivotal role in achieving success on YouTube. The level of engagement directly impacts how widely your video is shown to viewers by the YouTube algorithm. Higher engagement results in greater exposure, while lower engagement limits the video’s reach.
It’s essential to bear in mind that YouTube strives to connect your video with the appropriate audience, and its algorithm works diligently to identify and target those individuals.

Now, the question arises, how can you determine the quality of your video?
It’s common to receive polite responses like “That is very nice!” or “Cool presentation! I liked it” when showing your video to others. However, it can be challenging to gauge their true level of enjoyment. Are there parts of the video that were merely “OK,” while others were dull and in need of improvement? To address these uncertainties, YouTube Analytics provides valuable insights through Video Engagement metrics.

To gain a deeper understanding of audience behavior, Derral Eves presents the “YouTube Formula” in his bookThe YouTube Formula: How Anyone Can Unlock the Algorithm to Drive Views, Build an Audience, and Grow Revenue. This formula serves as a reliable roadmap for success, and it can be summarized as follows:
By following this iterative process of trying, failing, analyzing, and adjusting, you may continually improve your videos and better align them with your audience’s preferences.

To analyze your video and understand how your audience received it, there are several factors you should consider. After publishing your video, it typically takes around 48 hours for YouTube to start collecting data. Once you begin getting views, you can access valuable information through a graph. Here’s how you can view audience engagement on your video:
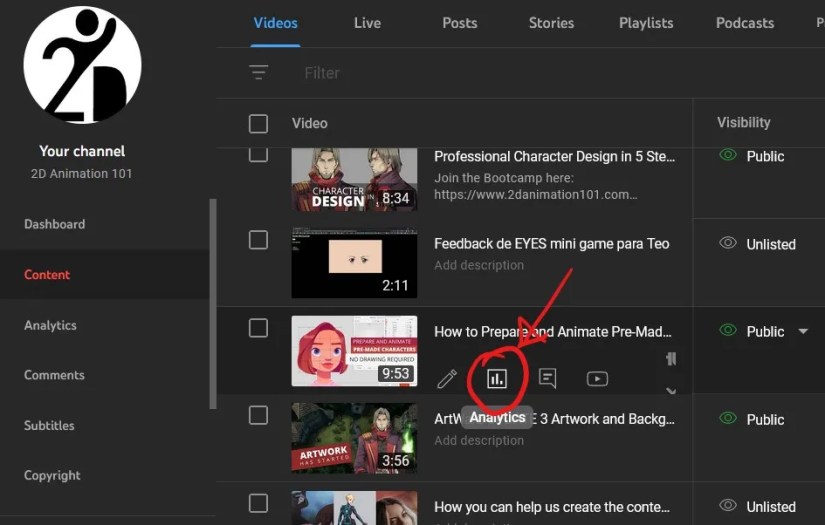
- Visit your YouTube Channel and click on theContenttab located on the left-hand side.

- Hover your mouse over the video you want to see analytics on, and click onAnalytics.
3. Click on theEngagementtab.
4. Scroll down until you see the video engagement graph.
Here are some metrics to pay attention to:
3. Amplifying Narrative With Animated GIFs
The use of GIFs in your video can significantly increase its visual appeal and engagement. There are various resources where you’re able to findGIFsfor almost any concept. Custom GIFs can also be created to align perfectly with your narrative.
(see the GIF result)
The type of GIFs you should probably focus on getting are the ones that have a transparent background, that way they can seamlessly be added to your animated projects without any problems.
Some cool resources to get GIFS are:
4. Harnessing the Power of APNGs in Your Presentations
Animated PNGs (APNGs)are another powerful visual tool that can enhance your explainer video.Freepik.comoffers a vast repository of drawings and 2D animation sequences in a single image that can be converted into APNGs using the APNG Assembler. Once ready, they can be easily imported into your CTA project as shown in this tutorial.
Images like the following examples from Freepik can be used to create APNGs or Sequences.
This sequence of acat running from Freepikcan be animated when put together into this sequence: (see the GIF result)
Orthis torch from Freepikcan be animated to this sequence (see the GIF result)
Let’s take the example of the torch. Once you have the torch elements put together into a single place, you’re able to export each object as a separate PNG, so it looks something like this:
Then you take the free software calledAPNG Assemblerand put those sequences together as an APNG.
Click and drag all images intoAPNG Assembler.
SelectDelays - All Framesto adjust the frames per second (fps). In this example, we’ll use 12 fps, so set the delay to 1/12 seconds. Finally, click onSetto confirm the changes.
Click on the ellipses…to access the output options. Next, selectMake Animated PNG, and you are done!
Now APNGs can be freely brought into Cartoon Animator 5.
You can learn more about GIFS and APNGS in this video:
5. Mastering Sequence Animations in CTA
Sequence animationsare a powerful way to make animated video fluid and dynamic. They allow for the smooth presentation of a series of actions or concepts. Learning to create and utilize sequence animations in CTA can add a new level of professionalism to your videos. This comprehensive guide can help you master sequence animations.
Basically, a 2D animation sequence inside CTA is like having several APNGs or GIFS into a single one that you can swap or switch into with ease. It’s very simple. Once you have a sequence created invector software like Illustrator, you can take it inside CTA and animate whatever sequence you need. For example, these three sets of explosions were added into a single file:
And in Illustrator, it looks like this:
If you pay attention, the layers show the correct structure you need for sequences created for CTA.
And inside CTA, when exported as an SVG, it looks like this:
An animated sequence that can switch between boom_1, boom_2, and boom_3 by just right-clicking on it, selectingAction Menu, and then selecting one of the options.
To learn more about how to create image sequences, you can check this tutorial:
Cartoon Animator by Reallusion Helps to Create Compelling Videos
Crafting a successful explainer video requires more than just technical knowledge. you’re able to use GIFs, APNGs, and image sequences as much as you want, but if you don’t have the correct storytelling, for the correct audience, you will not be able to create a compelling video.
How do you measure how compelling your video is? By uploading it to YouTube and checking the engagement analytics. If you have above 40% retention rate (Average Percentage Viewed) then that means your video is performing well.
The key is to use technology and the techniques you learned in this video in combination with a good story, animation, and audience understanding. To see how this all plays out together, you cancheck out this webinarthrough Reallusion Courses.
